Monday, August 5, 2013

Blueberry Buttermilk Coffee Cake


Blueberry Buttermilk Coffee Cake. Lucy Mercer/A Cook and Her Books
It's so easy to use up summertime blueberries ~ eaten out of hand, or in granola parfaits or salads, any time they can be enjoyed for their own tart and sweet selves. But save a few of the tart and sweet treats for this blueberry coffee cake.

This buttermilk coffee cake is delicious on its own, and downright delightful with the addition of blueberries. It's really just a loose scone dough, spread into a square pan and baked. The recipe is adapted from one of my favorite cookbooks, "Treasured Recipes of the Charleston Cake Lady" by Teresa Pregnall (Hearst Books, 1996). Mrs. Pregnall was a retired secretary in Charleston when she decided to turn her hobby of baking cakes into a business. Through the Charleston Cake Lady business, she shipped more than 20,000 cakes all over the country. Her cookbook is a winner, too, with recipes just right for home bakers.


Blueberry Buttermilk Coffee Cake

2 cups all-purpose flour
1 cup granulated sugar
1/2 teaspoon baking powder
1 teaspoon ground cinnamon
1/4 teaspoon salt
1/2 cup unsalted butter, softened
1/2 teaspoon baking soda
3/4 cup buttermilk
1 teaspoon vanilla extract
1 cup fresh blueberries, rinsed and dried

1. Heat oven to 375. Grease an 8-inch square pan.

2. Sift together the flour, sugar, baking powder, 1/2 teaspoon of the cinnamon, and the salt into a large mixing bowl. Cut in the butter with your fingers until mixture resembles coarse crumbs. Reserve 1/2 cup of the crumb mixture. Add the remaining 1/2 teaspoon cinnamon to remaining crumb mixture. Dissolve the baking soda in the buttermilk and add to the crumb mixture, stirring until the dry ingredients are well moistened. Add the vanilla extract.

3. Pour the batter into the prepared pan. scatter blueberries across the batter and press in. Sprinkle with the reserved crumb mixture. Bake for 35 minutes, or until the cake is lightly browned on top.

4. Cool the cake in the pan. Cut it into squares when the cake is completely cool.

Adapted from Treasured Recipes from the Charleston Cake Lady by Teresa Pregnall 
(Hearst Books, 1996)

Wednesday, July 31, 2013

Teacups in the garden, #DIY

Teacup in the garden. Lucy Mercer/A Cook and Her Books
 I think I'll take my tea in the garden.

Isn't this teacup adorable? It's a thrift store find, a Noritake bone china teacup and saucer, glued to a plant stake, now floating above the lantana in my garden. It could be a bird bath, a bird feeder, a whimsical piece of garden art, or a tealight holder.

And, it was super-easy and inexpensive to put together. Let's follow along, shall we?

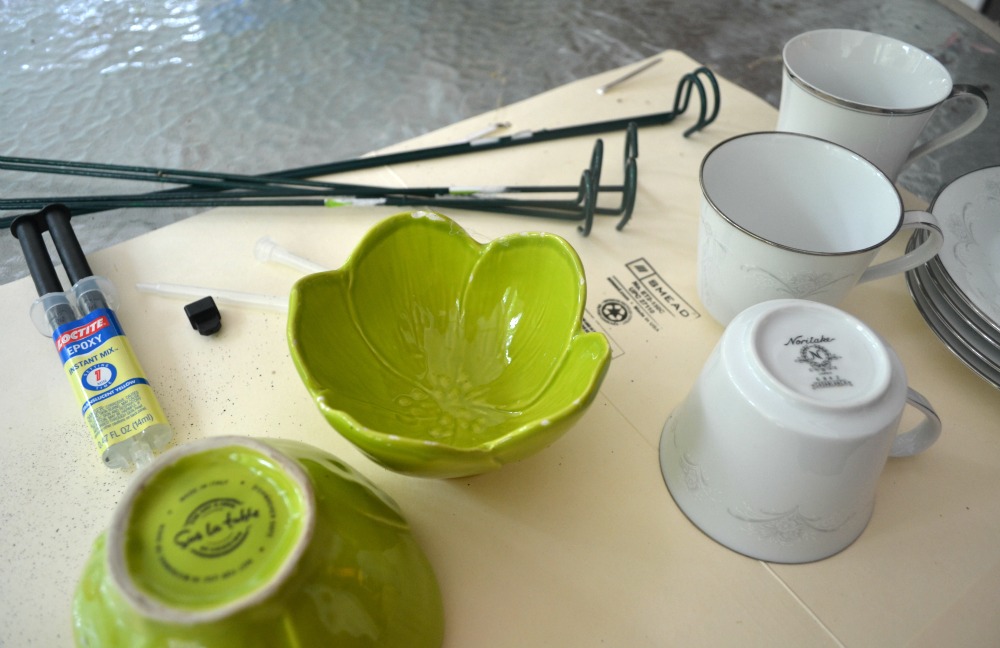
First, find some darling little teacups and saucers, or clever bowls. Do not pay retail. These teacups were a thrift store find, and because I bought them on half-price Monday, I paid less than $8 for four cups and saucers. I also found cute chartreuse Sur La Table bowls. While the teacups were in perfect condition, then green bowls had a few chips. I also paid less than a dollar for each, so no sweat. The point is, cheap and chipped are the way to go.

Bowls and teacups. Lucy Mercer/A Cook and Her Books

Second, go to your neighborhood hardware store and pick up some plant stakes. They come in a variety of sizes, just make sure the circumference of the wire loop will fit the base of the teacups and saucers. I paid 98 cents for each plant stake at Home Depot. And while I was there, I picked up some epoxy. This is Loctite brand, $3.97 at HD. The tube was enough for four cups and saucers, the two green bowls, and two repair jobs on chipped bowls at home.

Now, let's get to crafting. Choose a well-ventilated area and protect your workspace. Epoxy stinks to high heaven, so I chose the front porch table for this project. Follow the directions on the epoxy packaging, and work quickly. That stuff is super sticky! Holding plant stakes on to china is tedious, so I taped the glued stake to the saucer. Let the items set for at least 5 minutes. I let them cure overnight, just to be sure they would hold.

Teacups. Lucy Mercer/A Cook and Her Books

And then you have the crazy fun of find clever places for your new garden art. I like a grouping of the cups, like so:

Teacups and bowls. Lucy Mercer/A Cook and Her Books
The stakes make them easy to move around in the garden ~ from the flower bed to the containers on the porch. If you get tired of dumping rain water out the cups (and goodness knows, that's a daily reality in this damp summer), use them in a covered area like a porch. They can also be special occasion garden art, like good china brought out for special occasions. I think a row of bone china teacups with tealights makes a charming footpath through the night garden.

Give this project a try and let me know what you think.

Teacup with tea lights. Lucy Mercer/A Cook and Her Books