Showing posts with label recipe. Show all posts

Sunday, June 1, 2014

Black Bean and Corn Salsa Recipe


Black bean  salsa/A Cook and Her Books
I’m sure I’m not the only who finds themselves hummin’ a little Gershwin in these sultry late spring days. After the trees leaf out, but before the tree frogs start their thrumming, a chorus of “Summertime, and the livin’ is easy, fish are jumpin’ and the cotton is high…” plays through my head. The song, as I’m sure you know, is from George Gerswhin’s Great American Opera, “Porgy and Bess,” set in sweltering summery Charleston. The songs are grand and glorious and so infectious that I tend to forget that I’m not exactly Jessye Norman when it comes to musical ability.

And yes, I do know all of the words, and I will sing them off-key at the drop of any hat.

Here’s a summertime recipe, a little salsa that I put together with ingredients from my pantry and the farmer’s market ~ canned black beans, fresh tomatoes and corn make for an easy and delicious salsa that can be a snack, or on a sultry summer evening with the proper beverage, a meal.


Bean and Corn Salsa

1 can black beans, drained
3 or 4 tomatoes, chopped, or 1 can fire roasted diced tomatoes
3 or 4 scallions, chopped
Kernels scraped from 1 ear corn
1 clove garlic, minced
2 sweet mini peppers, chopped
1 jalapeno, seeds & membranes removed, chopped
Juice of 1/2 lemon or 1 lime
Salt and pepper to taste
Cilantro, chopped, optional
One avocado, diced, optional


1.       Combine all ingredients. Adjust seasonings and serve with tortilla chips. Refrigerate leftovers.

Monday, May 19, 2014

Pineapple Upside Down Biscuits


Pineapple Upside Down Biscuits. Lucy Mercer/A Cook and Her Books

Introducing a new favorite around our house, Pineapple Upside Down Biscuits. Do I even need to tellyou that this is a Paula Deen recipe from the word go? My husband saw Miss Paula talking about her recipe for Pineapple Upside Down Biscuits a while back, and asked me to make a pan of them, after all, Pineapple Upside Down Cake is his very favorite cake. Miss Paula's innovation is to create individual servings by placing the pineapple and brown sugar mixture into a muffin pan. Miss Paula pops open a tube of biscuits to top off her little cakes and I thought why not make a homemade biscuit and wouldn't they be even better? And you know what? I was right.


Pineapple Upside Down Biscuits

1 (10 oz.) can crushed pineapple, drained, with juice reserved
½ cup light brown sugar
½ stick butter, melted
12 maraschino cherries

1.       Preheat oven to 400. Grease muffin tins.
2.       Combine pineapple, sugar and butter in a small bowl and mix well. Divide mixture among the muffin cups. Place cherry firmly in center of each muffin cup.


Biscuits

2 cups all-purpose flour, White Lily preferred
1 tablespoon baking powder
1 teaspoon salt
1 teaspoon sugar
4 tablespoons shortening, chilled
1 cup buttermilk, whole milk preferred (I use Marburger brand)

1.       Into a medium bowl, sift flour, baking powder, salt and sugar. Add shortening and cut the fat into the flour using a fork or pastry blender. I use my fingers to rub the fat into the flour ~ it’s messy, but I get a better feel for how the fat is distributed throughout the flour.
2.       Pour in buttermilk and using a large spoon, stir until a dough is formed. With a light touch, place dough on lightly floured counter, gently press out with your hands to a uniform 1/2-inch thickness and cut out 1 dozen, 2-inch biscuits. I usually end up with 14, so you may have extras to bake alongside the pineapple biscuits.
3.       Place biscuits on top of pineapple mixture. Bake in 400 degree oven for about 13 minutes. Biscuits will be lightly brown and spring back when done. Place muffin pan on countertop to cool for five minutes.
4.       Cover a baking sheet with foil and turn muffin pan out onto baking sheet. Serve biscuits warm. Store leftovers in a covered container and refrigerate.

Text and images copyright 2014, Lucy Mercer.

Thursday, November 21, 2013

Butterscotch Pecan Chews Recipe

Butterscotch Pecan Chews. Lucy Mercer/A Cook and Her Books
A perfect excuse to bake (as if you need one): Here's an easy blondie recipe with a surprise ~ no butter. Four eggs hold the brown sugar and flour together and pecans add texture. These bars can be assembled and baked up in under an hour. If they're not gobbled up still warm from the oven, wrap them up tight, refrigerate and send in school lunches throughout the week. Guaranteed lunchtime friend-maker.

Butterscotch Pecan Chews

Non-stick baking spray
4 large eggs
1 pound dark brown sugar
2 1/2 cups self-rising flour
1 teaspoon vanilla extract
1 cup chopped pecans

1. Preheat oven to 350. Spray 9 inch square pan with baking spray. 

2. In a bowl, stir together eggs, brown sugar, flour and vanilla until smooth and nearly lump-free. Stir in the pecans.

3. Pour batter into greased pan. Bake until golden brown, about 25 minutes. Remove to cooling rack, and cut into squares when barely warm.

Adapted from "Treasured Recipes of the Charleston Cake Lady" by Teresa Pregnall (Hearts Books, 1996)

Text and images copyright 2013, Lucy Mercer.

Sunday, August 11, 2013

Roasted okra chips, #LetsLunch

Okra. Lucy Mercer/A Cook and Her Books
 
It doesn't seem like summer in the South until a friend gives you a bag full of fuzzy, prickly okra pods.  Like squash and zucchini, okra comes into season and home gardeners go from craving the funky vegetable to wondering what on earth they're going to do with it all. And that's where I come in, because I never turn down homegrown produce, especially okra. Stewed gumbo style with bacon and tomatoes and served over rice, it's classic mid-summer comfort food. It also takes well to roasting, a method that's perfect for a handful or a pound of pods, whatever you can get your hands on.

I first picked up the method for cooking okra from Southern cooking legend Nathalie Dupree, formerly of Atlanta, now living and writing in Charleston, South Carolina. Nathalie slices the pods, coats them with olive oil and roasts them in a hot oven. The result, depending on how thick you slice it, is a crispy okra chunk or chip that's a perfect summer side dish.


Roasted okra chips. Lucy Mercer/A Cook and Her Books

 Roasted Okra
1 pound okra pods
2-3 tablespoons extra-virgin olive oil
Salt, preferably fine-grained "popcorn salt"

1. Preheat oven to 425 degrees. Slice okra in chunks or more thinly for a chip, place in a bowl. Pour a tablespoon or two of olive oil over the okra, toss and season lightly with salt. Spread on baking sheet and roast for up to 10 minutes, checking often to make sure they don't burn. Remove from oven, let cool slightly, season carefully - it's so easy to over-salt these! - and serve.

This post is part of #LetsLunch, a monthly Twitter party on a given food subject. This month's theme is vegetables to celebrate Washington Post Food and Travel Editor Joe Yonan's newest cookbook, "Eat Your Vegetables: Bold Recipes for the Single Cook"  (Ten Speed Press, $24.99).

Annabelle‘s Farmer’s Market Gazpacho at Glass of Fancy
Cheryl's Egg-Drop Broccoli in Ginger-Miso Gravy at Cheryl Lu-Lien Tan
Eleanor‘s Green Beans Two Ways at Wok Star
Grace‘s Vegetable Tempura at HapaMama
Jill‘s Fusilli with Corn Sauce at Eating My Words 
Joe‘s Guaca-Chi at Joe Yonan
Linda‘s Chocolate-Zucchini Twinkies at Free Range Cookies
Linda‘s Gateway Brussels Sprouts at Spicebox Travels
Lisa‘s Totally “Free” Veggie Soup at Monday Morning Cooking Club
Pat‘s Umami-Laden Green Beans at The Asian Grandmothers Cookbook
Vivian‘s Kangkong (Water Spinach) with Fermented Beancurd, Chili and Garlic at Vivian Pei

Text and images copyright 2013, Lucy Mercer.
 

Thursday, June 6, 2013

The Girl in the Hat Goes on a Picnic


The laughing, dressed in a fresh white linen dress, joins her friends for a picnic in the mountains. She puts on her favorite straw hat over her long brown braid. The terrain is rugged, especially for a lady outfitted as a lady. The men are willing to help a young lady across the stream.

girl in hat 2

girl in hat 2

Part of being the only girl in a small family is inheriting the family history. These are pictures from my grandfather's photo album, snapshots from the 19-teens when he left Ohio and toured the West. The family thinks the pictures were made in Colorado. I was so enamored of the girl in the hat that since I first posted this story in 2010, I've made her image my avatar.

I wish I knew who the girl was - she has such a fresh face. White linen dress, big black bow, face framed by a floppy straw hat. I imagine she has a long brown braid under the hat. The pictures are from a series taken on a picnic in the mountains and these are the most interesting - which gentleman will carry the pretty girl across the river?

Imagining this grand day, I realize the romance factor has dwindled from my picnics. These days, Clark's sandals and a clean t-shirt and shorts are the order of the day. I like my straw hat, but rely on sunscreen to shield my face because I don't like hat hair.

My Picnic Menu
Pimento Cheese on Crackers
Ham Wraps with Spinach, Cream Cheese and Chives and Red Pepper Slices
Fresh Georgia Watermelon Slices
And brownies, always brownies. These are luscious, fudgy brownies, made rich with cream cheese. I intended to make a cream cheese ribbon through the chocolatey cake, but ended up stirring the cream cheese into the batter for an extra-rich brownie. You need to walk an extra mile to burn off these calories, but it's well worth it. After all, you're in your Clark's and not high-button boots. But if a gentleman offers to carry you across the river, well I wouldn't say no.

pimento cheese
Pimento cheese. Lucy Mercer/A Cook and Her Books.

Pimento Cheese
This is a boilerplate pimento cheese. There are lots of uptown recipes, and I've bookmarked Bellwether Vance's pimento cheese to try (she also has the ultimate minner cheese story).

8 ounces sharp Cheddar cheese
1 cup mayonnaise, approximately, (I've never bothered to measure)
Pinch of salt
2 tablespoons chopped pimentos

1. Shred Cheddar cheese on the coarse side of a hand grater or in a food processor.
2. In a bowl, stir together cheese and enough mayonnaise to bind. Add salt and pimentos. Serve with crackers or on squishy white bread.


brownies
Brownies with cream cheese. Lucy Mercer/A Cook and Her Books

Fudgy Icebox Brownies
These brownies came about from a failed attempt to make a cream cheese marble swirl in my regular brownie. I made both batters, swirled them to perfect marbling and placed the pan in the oven. Then I saw the bowl of three eggs, waiting to be used in the brownie batter. Ooops! Out of the oven, batter dumped in a bowl, eggs whisked in to the now-combined cream cheese and brownie batter. The resulting brownies are super-rich due to the cream cheese, and as good as they are warm, they are divine cold, so place them the bottom of the cooler, and finish off the picnic on a high note.

2 sticks unsalted butter, melted

2 cups granulated sugar

4 ounces cream cheese, softened

4 large eggs

1 teaspoon vanilla

3/4 cup natural cocoa powder (I use Hershey's)

2/3 cup unbleached all-purpose flour

1/2 tsp. baking powder

1/2 teaspoon salt

1. Preheat the oven to 350°F. Butter a 9-inch-square metal baking pan.

2. Melt the butter in a saucepan. Off the heat, stir in sugar, then the cream cheese, followed by the eggs and vanilla. Slowly stir in the flour, cocoa, baking powder, and salt, until the batter is smooth and free of lumps.

3. Spread the batter into the prepared pan. Bake until a toothpick or a skewer inserted 3/4 inch into the center of the brownies comes out with just a few moist clumps clinging to it, about 40 minutes. Let the brownies cool completely in the pan on a rack.

4. Cut into squares. Store the brownies in the refrigerator in a covered container.


watermelon
Watermelon slices. Lucy Mercer/A Cook and Her Books

Watermelon. What can I say? It's Georgia in June and the watermelons are sweet and available at every fruit and vegetable stand by the side of the road. Chill the melon in the fridge, then carve into chunks and what my family calls "pie slices"- with a handy rind handle for kids to hold.


Text and images © 2013, Lucy Mercer.
This story is a re-post for #LetsLunch, a monthly Twitter party for food bloggers all over the world. 
This month's theme is Too Hot to Cook. Thanks Grace Hwang Lynch of HapaMama for hosting 
this month's party! Check back here for links to this month's stories and recipes!

Grace's Mung Bean Shaved Ice at HapaMama
Monica’s Peanut Salad at A Life of Spice
Lisa’s Aperol Spritz Granita at Monday Morning Cooking Club
Cheryl’s Mango-Key Lime Pie at A Tiger in the Kitchen
Linda’s Escape from San Francisco Picnic at Spicebox Travels
Pat’s Almost No-Cook Rice at The Asian Grandmother’s Cookbook
Linda’s Coconut Creamsicle Sodas at Free Range Cookies
Emma’s Cheese Plate at Dreaming of Pots and Pans
Anne Marie’s Lettuce Sandwiches at Sandwich Surprise

Wednesday, June 5, 2013

Eggplant and tomato spaghetti


Eggplant and tomato spaghetti. Lucy Mercer/A Cook and Her Books
 

At the height of summer, when the markets are filled with Technicolor produce, pick out a beautiful, plump eggplant and a few heirloom tomatos and make this sumptuous variation on ratatouille. Minus the squash, it's still rich with roasted vegetal and herbal deliciousness. This recipe is adapted from Francis Lam's Let-My-Eggplant-Go-Free! Sauce

 Eggplant and Tomato Spaghetti

Serves 3 generous portions

1 pound eggplant, peeled and cut into ½ inch dice
1 tablespoon salt
3 ripe tomatoes
1/3 cup extra virgin olive oil
3 cloves garlic, smashed
2 sprigs thyme or oregano, chopped
1 cup  water
6 leaves basil, chiffonade
Salt and pepper to taste
1 pound spaghetti, cooked

1. Place the eggplant cubes in a sieve over a bowl and toss with salt. Let sit for a half hour to draw the bitter juices out of the eggplant. Meanwhile, peel and cut the tomatoes into chunks.

2. In a heavy saucepan such as a Dutch oven, pour in the olive oil and set over low heat. Add the garlic cloves.

3. Wipe any moisture off of the eggplant. When the garlic sizzles, add the eggplant and stir to coat it with oil. Turn up the heat, add the tomato and herbs and stir. When the eggplant and tomato soften, add the liquid, let it come to a boil, then lower the heat to medium-low. Cover the pot, leaving an edge exposed for steam to escape.

4. After about 20 minutes, the vegetables should be soft and melting and ready for the pasta. Taste and adjust the seasonings. Serve immediately, garnished with additional basil.

Text and images copyright 2013, Lucy Mercer.

Thursday, May 9, 2013

Chopsticks, #LetsLunch


Chinese Chicken Salad. Lucy Mercer/A Cook and Her Books

"The place I like best in this world is the kitchen. No matter where it is, no matter what kind,
 if it's a kitchen, if it's a place where they make food, it's fine with me." 
~ Banana Yoshimoto, Kitchen (Pocket Books, 1988)


I've been explaining myself a lot lately, which means making excuses. When readers and followers ask why I haven't posted much lately, I pull out the usual ~ my kids are keeping me busy, work is crazy, I'm drowning in my house. But the truth is, it's been easy not to write. I'm going back to what I loved to do before I became a slave to the blog ~ enjoying cooking, perusing cookbooks, reading novels. Cleaning the spiderwebs out of the corners of my house, thinking about planting a garden. Calling friends. Planning playdates.

More truth ~ I love reading blogs as much (or maybe more) than I enjoy writing my stories. Of course, I'm reminded of Hemingway's famous quote about writing: “There is nothing to writing. All you do is sit down at a typewriter and bleed."  

Over the past several years, while my passport sits unused in the safe deposit box, I've traveled all over the world through the words of my blogging friends. I've followed life stories ~ found out what it was like to grow up in New England, California, Texas, Canada, Mexico, Puerto Rico. Many of the life stories are stories of Asia, growing up overseas, or in the U.S. as children of immigrants. 

And this is where I step to the side and with my very best Vanna hands reveal that May is Asian-Pacific Heritage Month and my friends at #LetsLunch have many fabulous stories to tell and recipes to share on the theme of Asian foods. (See links at the bottom of the page.)

As for me, I finally got around to making this streamlined version of Fine Cooking's Crunchy Chinese Chicken Salad. It's got the sweet-heat-sour-salty thing going on, plus the reason I love salads ~ crunch upon crunch upon crunch. I hope you give it a try.


Crunchy Chinese chicken salad. Lucy Mercer/A Cook and Her Books.

Chinese Chicken Salad
adapted from Fine Cooking magazine

This is a streamlined version of a delicious salad found in Fine Cooking Magazine. The dressing is key.

2 bone-in chicken breasts, roasted, meat removed and chopped
2/3 cup sliced almonds
2 oz. sugar snap or snow peas, steamed
1/2 small head Napa cabbage, shredded AND
1/2 romaine heart, sliced into 1/2 inch wide strips OR packaged cole slaw mix
3 large scallions, white only, thinly sliced
Wonton strips, recipe follows
Dressing, recipe follows

Wonton strips
8 square wonton wrappers
Vegetable oil spray
Salt, preferably fine grained, like popcorn salt

1. Stack wonton wrappers and slice into 6 equal strips. Spray with vegetable oil and toss gently. Bake in a 300 degree oven for about 6 minutes, watch carefully or they will burn. (I used a toaster oven for this!).

Dressing
1/4 cup rice vinegar
1 1/2 tablespoons soy sauce
1 1/2 tablespoons sweet Asian chile sauce
2 cloves garlic, minced
2 teaspoons minced fresh ginger
1/4 cup peanut oil
1 tablespoon Asian sesame oil
Salt and freshly ground pepper to taste


 1. In a small bowl, combine the rice vinegar, soy sauce, chile sauce, garlic and ginger. Pour in the sesame oil and peanut oil and whisk until emulsified. Season with salt and freshly ground black pepper to taste.

Assemble salads

Toss chicken with about 1/4 cup dressing. For each salad, start with a bed of greens or cole slaw mix, then top with chicken, almonds, snow peas and cripsy wonton strips.

This post is part of #LetsLunch, a monthly Twitter party. This month's theme is Asian Foods, to celebrate Asian-Pacific Heritage Month. check back here for an updated listing of this month's participating bloggers.


Cheryl’s Spicy Korean Tofu at A Tiger in the Kitchen
Karen’s Wonton Soup at GeoFooding
Lucy’s Chinese Chicken Salad at A Cook and Her Books
Emma’s quick and dirty guide to Korean BBQ at Dreaming of Pots and Pans
Lisa’s Asian Sesame, Eggplant and Noodle Salad at Monday Morning Cooking Club
Bulgogi Lettuce Wraps with Kimchi Chips and Fried Rice at Sandwich Surprise
Grace’s Mama’s Tips for Stir Fry at Hapa Mama


Text and images copyright 2013, Lucy Mercer.

Thursday, April 11, 2013

Fangirly fun, #LetsLunch


Spring photos by Laura Mercer


Spring break is a staycation this year, due as much to a lack of inspiration as a lack of budget. It’s a holiday cut short by work obligations, the school week grind broken by silenced alarm clocks, easy evening meals, and after-dinner strolls through the neighborhood. All told, I’ve been busy, but haven’t gotten a whole lot done. The laundry mountain is reduced and the kitchen is clean, and that’s about all I have to say for myself.

While it seems that most residents of our little town are sticking their toes in squeaky Gulf Coast sand this week, there are a few folks left, and that means opportunities to try new things. Or, in this case, maybe a very old thing ~ joining in with a few hundred screaming girls at a teen dream concert, in this case 16-year old Australian cutie pie Cody Simpson. 

Cody Simpson


The Australian teen idol was in Atlanta for the NCAA March Madness and a friend invited my 14 year old daughter and me to join her for the concert followed by a meet and greet. Now, there is a certain blond Australian with initials C.S. that I would love to meet...

Curtis Stone

...But Cody Simpson is pretty darn cute, too. With a mid-century Bad Boy pompadour and a guitar, he’s a throwback Teen Idol with chops. And he puts on a great show. 

To be honest, I felt a little bit old. I worried about embarrassing my daughter by clapping too much,  or cheering too much. Standing up, sitting down. And that sound, that screaming teen girl sound, it’s hard to believe that I once knew how to make that sound.

At the meet and greet, Cody was very sweet and looked impossibly young. I guess I’ve done a 180: it doesn't seem like that long ago that I was a teen girl squealing “isn’t he just cuuuuute?” and now I'm smiling at this young man and thinking “oh my goodness, his parents must be so proud.” 

And so I send out this long distance dedication to Cody.

 If Google is to be believed, Cody’s favorite foods are  pizza, hamburgers and milkshakes. In other words, typical teen boy food. If that cutie pie ever came to my house, I’d feed him my pizza muffins and a Nutella milkshake. And I’d lock my daughters in their rooms.
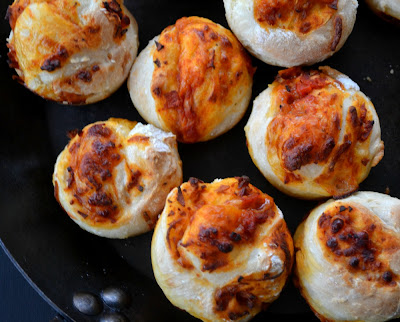
Pizza muffins. Lucy Mercer/A Cook and Her Books


Pepperoni Pizza Swirl Muffins

These muffins are endlessly adaptable. I go old school with pepperoni and mozzarella cheese, but you may add whatever pizza toppings float your boat.

2 (6.5 oz. packages) pizza crust mix                    
1 cup warm water
Flour for rolling out dough
1/2 cup pizza sauce
1/2 cup shredded Italian blend cheese
1/2 cup chopped pepperoni
Extra pizza sauce for dipping

1.       Heat the oven to 425. In a bowl, stir together the two packages of pizza crust mix and 1 cup water. Let rest. Grease a 12-cup muffin pan.
2.       Turn dough out onto a floured counter and press into a rectangle. Spread pizza sauce over dough, then cheese and pepperoni. Roll dough lengthwise, jelly roll fashion. Pinch together the edges. Slice dough into 12 pieces.
3.       Place each dough round into a muffin cup. Bake at 425 for 15 minutes. Let cool on wire rack for 5 minutes, then serve with extra pizza sauce for dipping.

Pepperoni pizza roll. Lucy Mercer/A Cook and Her Books


Nutella Milkshake with Toasted Marshmallow Topping

3 scoops chocolate ice cream
¾ cup whole milk
¼ cup Nutella
1 cup mini marshmallows or 6 regular marshmallows

1. In a blender, combine the ice cream, milk and Nutella and blend until fully incorporated. Top individual servings with marshmallow topping:
2.       To make marshmallow topping: A toaster oven is ideal for this, but you may use a regular oven set at 350. Spray a piece of foil with vegetable oil spray. Sprinkle marshmallows in an even layer on the foil. Toast at 350 for about five minutes. Keep an eye on them! When marshmallows are tan and puffy, remove from oven and let cool. Top milkshake with marshmallows. 


Nutella milkshake with toasted marshmallow topping. Lucy Mercer/A Cook and Her Books

 This post is my April contribution to #LetsLunch. This month's topic is spring break food. You may follow my #LetsLunch Pinterest board here and check out these great posts from other #LetsLunch writers:

Jill's Basil-Infused Cotillion Cocktail at Eating My Words
Lisa's Beetroot and Salmon with Horseradish at Monday Morning Cooking Club
Linda's Instant Carrot Cake at Free Range Cookies
Karen's Sourdough Sandwich Bread at Geofooding
Linda's Guide to Eating in Cancun at Spicebox Travels
Ann Marie's Mofongo with Ground Beef at Sandwich Surprise

Text and images copyright 2013, Lucy Mercer.


Tuesday, January 8, 2013

Broccoli and Cauliflower Salad with Bacon

Broccoli and cauliflower salad with bacon. Lucy Mercer/A Cook and Her Books
This broccoli salad is a tried and true favorite, easy to pull together as a weeknight side dish. Recently, I had cauliflower in the vegetable crisper as well as broccoli, so I added it to the salad for color and contrast. The dressing is less sweet than many versions - I think it's just right for the amount of vegetables.

Broccoli & Cauliflower Salad with Bacon

2 cups broccoli florets
2 cups cauliflower florets
6 slices bacon, chopped and cooked 'til crisp
a handful sunflower seeds
a handful dried raisins or cranberries
1 cup good-quality mayo, full fat or go home
6 green onions, chopped in 1-inch long pieces
2 tbsp. sugar
2 tbsp. white wine vinegar

In a lovely serving bowl, put trimmed broccoli and cauliflower pieces, sunflower seeds, bacon and raisins. In a food processor, blitz the onions, mayo, sugar and vinegar together. Season to taste, remembering that the salad has salty bacon and sunflower seeds. Pour dressing over salad. Serve immediately. Store leftovers in a covered container in the refrigerator.

Broccoli and cauliflower salad with bacon. Lucy Mercer/A Cook and Her Books


Text and images copyright 2013, Lucy Mercer.

Tuesday, December 4, 2012

Fruitcake Cookies Recipe

Fruitcake cookies. Lucy Mercer/A Cook and Her Books
 I'm not one of those people easily offended by fruitcake. Not a hater. The dense, spicy cake may be an acquired taste, and moderation is certainly a key, but generally I have positive memories of fruitcakes at Christmas. Every December, we would receive a Collins Street Bakery Deluxe fruitcake in its signature red tin, ordered by my grandfather. The cake was stored in the refrigerator and when we had company, it was brought out, sliced very thin and served with my Mom's homemade cookies and eggnog.

Nobody sends me fruitcake anymore, and I guess it's just as well. I do get my candied fruit fix each year when my Mom bakes these fruitcake cookies. These are chewy and tender and so, so good. I've printed the recipe just as it appears in Mom's much-loved copy of a local church cookbook, the 1993 Arbor Heights Cookbook, Vol. II.

Eveleen Lanier's Christmas Cookies
by Brenda Sanders
from 1993 Arbor Heights Cookbook Vol II


by Arbor Heights WMU (Women's Missionary Union)

1/4 cup unbleached all-purpose flour
2 cups chopped candied fruit - I used glaceed cherries and pineapple (dried cherries and pineapple would work if you don't like candied fruit)
1 (8 ounce) package flaked coconut
8 ounces pecans

1 cup (2 sticks) unsalted butter
3/4 cup sugar
3/4 cup light brown sugar
2 eggs
1 teaspoon vanilla
1 teaspoon baking soda
1/2 teaspoon salt
2 cups unbleached all-purpose flour

1. Preheat oven to 300.

2. In a large plastic bag, place flour, then chopped candied fruit. Shake to coat. Add coconut and pecans and shake again.

3. With an electric mixer, cream together butter and sugars until light-colored and fluffy. Add eggs and vanilla and beat again.

4. In a bowl, stir together dry ingredients - baking soda, salt and flour.

5. Gradually mix dry ingredients into batter, until fully incorporated. Add floured fruit and nut mixture, stirring by hand.

6. Drop by teaspoonfuls on ungreased cookie sheet and bake 25 to 30 minutes - low and slow to get that light brown color and chewy texture. Makes 100 cookies. (no kidding).


Text and images copyright 2012, Lucy Mercer.

I created a Pinterest board with my favorite cookie recipes, plus a few others that I want to try. Check it out here. 

And let me know if you're on Pinterest!

Wednesday, December 14, 2011

Retro favorites, two sweet, one savory


Orange-pecan coconut candy Lucy Mercer/A Cook and Her Books
Maybe it's because I love "Mad Men," or maybe it's the other way around, but the early 60s seem to have a hold on me. I can do without the floofy hair and the waist-whittling foundation garments, but everything else - pointy-toed heels, handbags and gloves; the Betty Crocker kitchen and the Corningware casseroles, I love. Maybe it's because my parents were married in 1962 and our house was filled with the everyday items of that era. Nevertheless, I'm in a retro frame of mind and a few of my childhood favorites, (no doubt gleaned from my mother's copy of the Better Homes & Gardens cookbook, or from a handwritten recipe card from a friend) usually grace my Christmas goodie plates.

Here are a few of my favorites, beginning with the classic no-bake treat, orange-pecan-coconut candy. If you can melt butter, you can make these treats. Another favorite, this time a stovetop treat, crispy date candy, made with Rice Krispies. The only downside to this recipe is that it makes so few, you'll find yourself hiding the box in the back of the refrigerator and sneaking little nibbles during the day, and possibly night.

Crispy date candy. Lucy Mercer/A Cook and Her Books
Every 60s hostess will recognize this recipe for cheese wafers, although this is the plain version. It's usually gussied up with pecans or cayenne pepper. My kids love these plain - in fact, they're quite lovely with a bowl of soup. If you're a smart cook, you'll make an extra loaf of the dough, wrap it well and place it in the freezer for those times when supper's running late and you need to feed someone something good fast.

Cheese wafers. Lucy Mercer/A Cook and Her Books
Cheese Wafers

1/2 cup (1 stick) unsalted butter, softened
1 cup shredded Cheddar cheese
1 cup unbleached all-purpose flour

Preheat oven to 375. Combine all ingredients in a food processor and pulse just until mixture comes together to form a dough. Remove work bowl from processor and, using whatever little hands are available (my three year old loves this part), form walnut-sized balls and place them on a lightly greased baking sheet (the slick wrapper from the butter works especially well for this purpose). Bake at 375 for 15 minutes, or until set, but not really brown. Remove from oven and let cool. Don't let them cool too long on the baking sheet or they may stick. When cool, place in a paper-towel-lined airtight container.

Text and images copyright 2011, Lucy Mercer.


Sunday, July 31, 2011

Gad Zukes! It's Time for Zucchini Bread!

Zucchini by Lucy Mercer/A Cook and Her Books

When life gives you zucchini, you don't have much time to muck about. You can make zuke soup, Mollie Katzen's ZuCanoes, ratatouille, and zucchini bread, but you better be fast because fresh zucchini only lasts a few days before shriveling to primordial ooziness. Here's a zucchini bread that yielded two loaves, one big, one small. The large one made breakfast toast for a week. The baby loaf made the kids at work happy for about 10 minutes. Then they asked what I would bring tomorrow. Something about orange scones...


Zucchini Bread by Lucy Mercer/A Cook and Her Books

Zucchini Bread

adapted from "Bon Appetit, Y'all" by Virginia Willis

1 cup canola oil

3 cups all-purpose flour

3/4 cup sugar

1 teaspoon salt

1 teaspoon baking powder

1 teaspoon baking soda

1 teaspoon cinnamon

3 eggs

1 tablespoon vanilla

4 zucchini, peeled and grated, yielding 2 cups

1. Preheat the oven to 350. Grease two loaf pans with baking spray or cooking oil. I used one medium and one small loaf pans, you may do well with just one large loaf pan.

2. In a bowl, whisk together the dry ingredients, whisk together.

3. In a measuring cup, place the oil, eggs and vanilla and stir together.

4. Add the wet to the dry mixtures, stirring just until combined. Pour the batter into the prepared pan(s).

5. Bake until golden brown, with the cracked spine along the top, about one hour. Transfer to a wire rack to cool for about five minutes, then turn out of the pan. Keep at room temperature, well-wrapped, for a few days.

Saturday, July 23, 2011

Scones, the Raspberry Variation

Raspberry buttermilk scones by Lucy Mercer/A Cook and Her Books
My buttermilk scone recipe is like gesso on a blank canvas, ready for whatever fruits I fancy. In the winter, raisins and dried cranberries get their turn, folded into the sweet, buttery dough. In summer, fresh, ripe berries take a tumble in the biscuits. I wrote at length about the blueberry version, Blueberry Lemon Buttermilk Scones, including step-by-step instructions for the shaping technique.

I'm pleased to report that the raspberry version is just as luscious as the blueberry version. Buy a pint of red raspberries at the store and let your kids eat a few, putting them on each little finger. Fold the rest into this recipe and enjoy a teatime treat - berry-studded scones, hot from the oven.

Raspberries by Lucy Mercer/A Cook and Her Books


Raspberry Buttermilk Scones


A key to tender scones is to shred frozen butter into the dry ingredients. I store butter in the freezer, so this is usually convenient. In the wintertime, when my house is at 68 degrees, I can get by using butter straight from the refrigerator, but in the summer, when the house is at 78 degrees, frozen butter makes a big difference.

3 cups unbleached all-purpose flour

1/3 cup sugar

1 teaspoon. salt

2 1/2 teaspoons. baking powder

1/2 teaspoon. baking soda

3/4 cup unsalted butter, frozen

1 1/4 cups buttermilk, plus extra

1 cup raspberries, fresh or frozen

Half and half or milk or cream for glazing, optional

Demerara or sparkle sugar for glazing

1. In a batter bowl, mix dry ingredients together. Using a regular grater, shred the frozen butter and lightly mix the shavings into the dry ingredients. Using your hands and a gentle, quick touch, make sure the butter is evenly distributed throughout the flour mixture.

2. Pour in the buttermilk and stir gently with either a wooden spoon or my instrument of choice, a silicone spatula. If mixture seems dry, add additional buttermilk until a cohesive dough forms. The dough should be slightly wet and sticky, but not overly so.

3. On a floured countertop, press dough into a rough 12 X 6 inch rectangle and follow shaping instructions above. Fold in raspberries, then fold into thirds, letter-style. Press into 12 X 6 rectange again and fold letter-style again. Press again into a 12 X 6 rectangle and cut into 16 triangles. Place scones on a lined baking sheet. The scones can be refrigerated, covered, for up to 24 hours.

4. When ready to bake, preheat oven to 400 degrees. Carefully brush each wedge with buttermilk or cream and sprinkle sugar over the top. Bake at 400 for at least 15 minutes. They may need a bit more time, depending on your oven, convection, etc. Scones are ready when they are golden brown on top and bounce back when touched lightly in the center.

If this is more scones than you want to bake (all that butter!), check out my half-recipe.

Text and images copyright 2011, Lucy Mercer.